
Sushi bowls are quickly becoming a beloved staple for food lovers everywhere—and it’s easy to see why. They offer all the flavors and flair of traditional sushi, without the need for rolling mats or perfect technique. Whether you’re craving fresh seafood or plant-based options, a sushi bowl is endlessly customizable, making it perfect for weeknight dinners, meal prep, or even upscale gatherings.
Packed with vibrant vegetables, rich proteins, tangy sauces, and warm, vinegared rice, sushi bowls blend convenience and nutrition in one colorful bowl. They transform sushi into something you can whip up at home without stress—no sushi chef required. From tuna and salmon to tofu and crab, sushi bowls give you the freedom to personalize every bite.
So, if you’ve ever wanted to bring sushi into your kitchen without the mess or complexity, it’s time to fall in love with sushi bowls. In this recipe, we’ll break down exactly how to build a mouthwatering sushi bowl from scratch—balanced, beautiful, and better than takeout.
Why You’ll Love This Recipe
Sushi bowls aren’t just trendy—they’re genuinely practical and crave-worthy. Here’s what makes them so irresistible:
- Build-Your-Own Flexibility: Pick your favorite fish, veggies, sauces, and toppings. You’re in control.
- Beginner-Friendly: No rolling, no special tools, no intimidation—just simple layering.
- Nutrition-Packed: Balanced with protein, fiber, healthy fats, and a rainbow of veggies.
- Meal Prep Magic: Prep components ahead and assemble in minutes whenever hunger strikes.
- Budget-Conscious: Less expensive than restaurant sushi with just as much flavor.
- Visually Stunning: With bright greens, pinks, oranges, and purples, sushi bowls are an Instagram-worthy meal every time.
Preparation and Cooking Time
- Preparation Time: 25 minutes
- Cooking Time: 20 minutes (for rice and prepping ingredients)
- Total Time: Approximately 45 minutes
This makes it totally doable for a weeknight meal but impressive enough for a special occasion.
Ingredients
Here’s everything you’ll need to make a classic, build-your-own sushi bowl:
For the Sushi Rice:
- 2 cups sushi rice (short-grain white rice)
- 2 ½ cups water
- 3 tablespoons rice vinegar
- 1 tablespoon sugar
- 1 teaspoon salt
Proteins (choose your favorites):
- 4 oz sashimi-grade tuna, diced
- 4 oz sashimi-grade salmon, diced
- 4 oz yellowtail or other sashimi-grade fish, sliced
- ½ cup cooked shrimp, peeled and deveined
- ½ cup imitation crab (or real lump crab meat)
- ½ block firm tofu, cubed and lightly pan-fried
Veggies & Toppings:
- 1 avocado, sliced
- 1 cucumber, thinly sliced
- 1 small carrot, julienned
- ¼ cup radishes, thinly sliced
- ½ cup shelled edamame
- 2 tablespoons chopped green onions
- 1 sheet nori, cut into thin strips
- 1 tablespoon sesame seeds (white or black)
Sauces & Condiments:
- Soy sauce (for dipping or drizzling)
- Spicy mayo (mix mayo + sriracha)
- Ponzu sauce (for a citrusy twist)
- Pickled ginger (optional)
- Wasabi (optional)
Step-by-Step Instructions
Creating a sushi bowl may seem like a lot, but each step is super manageable—especially when broken down. Let’s walk through it together.
1. Prepare the Sushi Rice
Sushi rice is the heart of the bowl, so don’t skip this part!
- Rinse the rice under cold water until the water runs clear.
- In a rice cooker or saucepan, combine the rice with water and cook according to the package or rice cooker instructions.
- While the rice is cooking, mix the rice vinegar, sugar, and salt in a small bowl. Stir until dissolved.
- Once the rice is cooked, transfer to a large bowl. Gently fold in the vinegar mixture using a rice paddle or wooden spoon. Let it cool slightly before using.
Tip: Don’t over-mix. Gently fan the rice to cool it down while mixing—this helps create that signature glossy sushi rice texture.
2. Prep the Proteins
Here’s how to handle your fish and other proteins:
For Raw Fish (Tuna, Salmon, Yellowtail):
- Make sure you’re using sashimi-grade fish only.
- Dice into bite-sized cubes or thin slices.
- Keep cold until serving.
For Cooked Shrimp and Crab:
- Shrimp: Boil or steam briefly if raw. Slice in half lengthwise if large.
- Crab: Use flaked imitation crab or real lump crab. No cooking required.
For Tofu:
- Cube the tofu.
- Lightly pan-fry in a non-stick pan with a splash of soy sauce for golden edges.
Tip: You can mix your tuna or salmon with spicy mayo or a splash of ponzu for extra flavor, or leave it plain to let the natural taste shine.
3. Prepare the Veggies
Use a mandoline or sharp knife for thin, beautiful slices.
- Avocado: Slice just before serving to prevent browning.
- Cucumber & Carrots: Keep them raw and crisp.
- Radishes: Add peppery crunch and stunning color.
- Edamame: Boil for 3–5 minutes if frozen. Drain and cool.
Tip: Chill your sliced veggies in cold water before assembling to keep them fresh and snappy.
4. Make the Sauces (Optional but Highly Recommended)
Spicy Mayo:
- Mix ¼ cup mayonnaise with 1–2 teaspoons sriracha (adjust to your heat preference).
Ponzu Drizzle:
- Use bottled ponzu or make your own by mixing soy sauce with lemon juice and a dash of rice vinegar.
Keep soy sauce, pickled ginger, wasabi, and green onions handy for topping and serving.
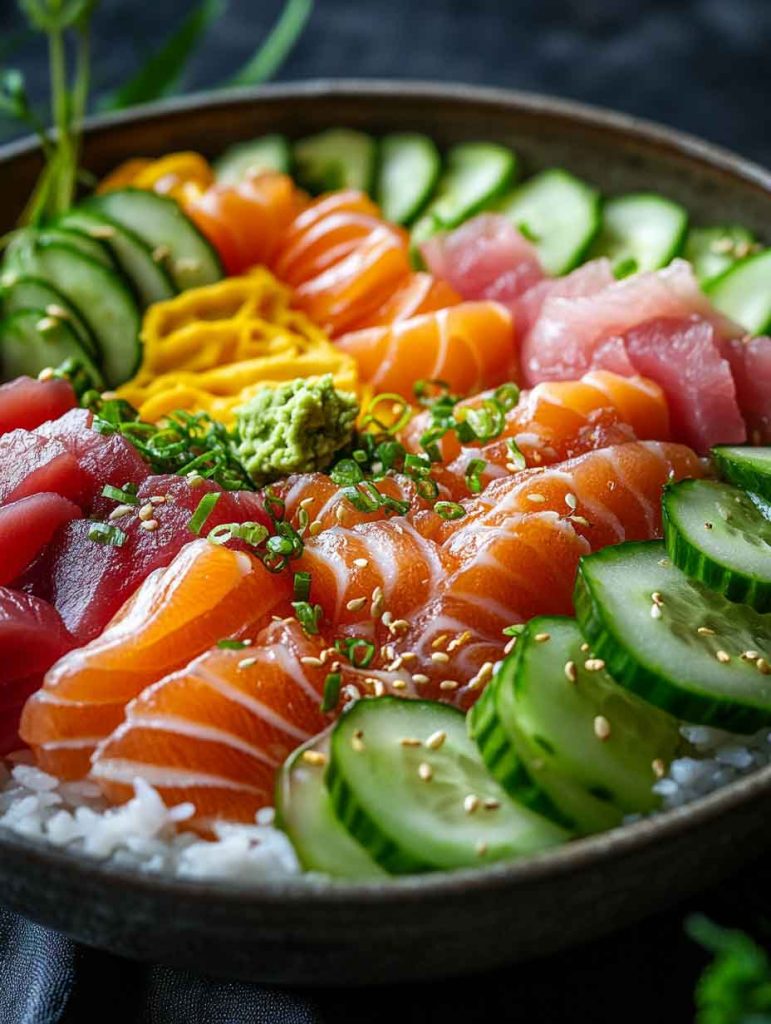
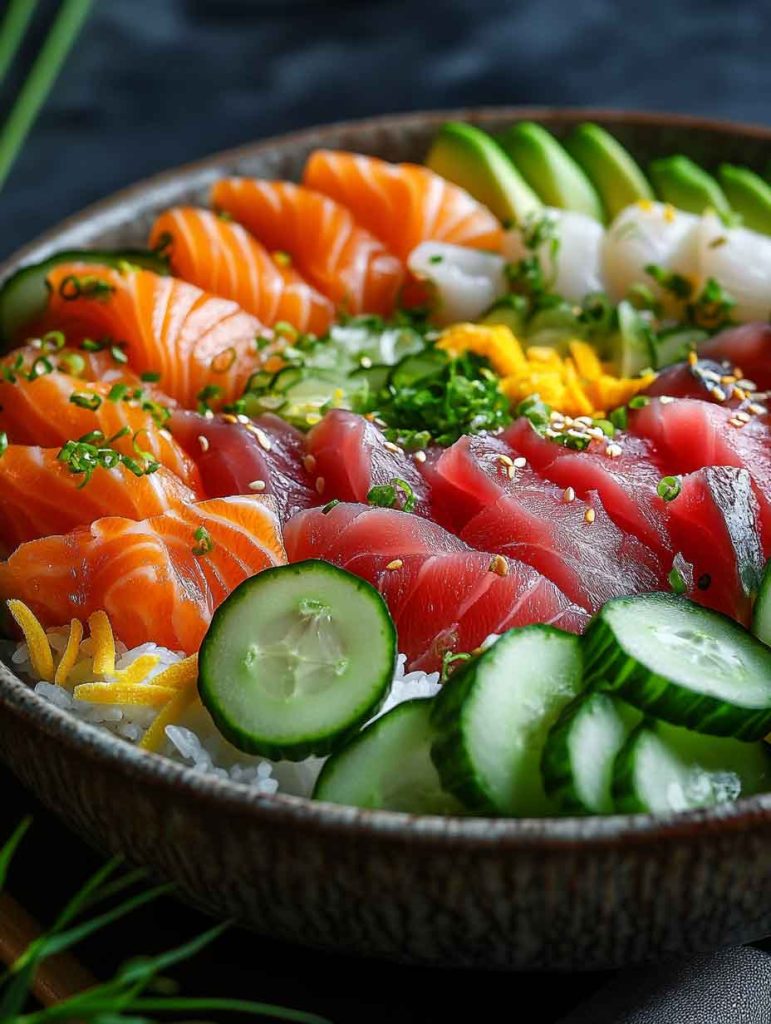
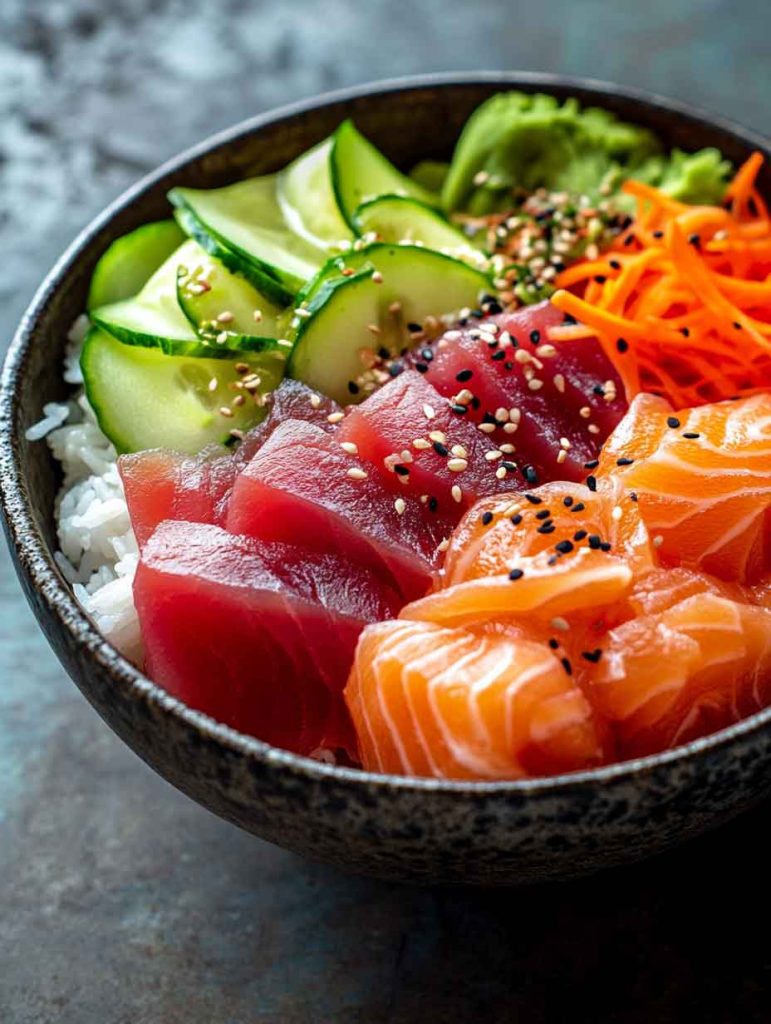
5. Assemble Your Sushi Bowl
Now comes the fun part—layering it all together.
- Start with Rice: Scoop about 1 cup of sushi rice into a bowl.
- Add Proteins: Arrange your chosen proteins in sections or grouped neatly.
- Top with Veggies: Fan out sliced cucumber, avocado, radishes, carrots, and edamame.
- Add Nori and Garnishes: Sprinkle nori strips, sesame seeds, and green onions.
- Drizzle and Dip: Spoon on spicy mayo or ponzu. Serve soy sauce and wasabi on the side.
Tip: Aim for a balance of colors, textures, and flavors. It’s part art, part meal.
How to Serve
Presentation takes sushi bowls from “weeknight meal” to “wow-worthy.” Here’s how to plate them beautifully and practically:
- Use Wide, Shallow Bowls
These allow you to display each ingredient separately, making the dish visually appealing and easy to eat. - Group Ingredients Thoughtfully
Arrange each item in small mounds or wedges—keep the rice visible at the center, then build color around it. - Balance Textures
Mix creamy (avocado, mayo) with crunchy (radish, cucumber) and soft (rice, tofu or fish) for a satisfying experience. - Serve with Chopsticks and Spoons
It’s casual but still gives that sushi bar vibe. Include small bowls of soy sauce and ponzu for dipping. - Make it a DIY Station
Hosting friends or family? Lay out the components buffet-style and let everyone build their own bowl. It’s interactive, easy, and fun.
Pro Tips & Variations
Want to take your sushi bowl to the next level? Try these tips and creative spins:
Tips for Success:
- Keep Ingredients Cold: Especially raw fish. Serve immediately after assembling.
- Use Wet Hands: When handling sushi rice, a little water on your hands keeps things from sticking.
- Mix Sauces in Advance: Pre-made spicy mayo or ponzu stays good for up to a week in the fridge.
- Chop Uniformly: Neatly cut veggies and proteins improve presentation and texture.
Delicious Variations:
- Teriyaki Chicken Bowl: Swap raw fish for grilled teriyaki chicken and add pickled red onions.
- Plant-Based Delight: Use tofu, edamame, avocado, and pickled radish with a drizzle of sesame oil.
- Poke Bowl Style: Marinate tuna or salmon in soy sauce, sesame oil, and scallions before topping.
- Brown Rice or Quinoa Base: Add a nutritional twist with whole grains instead of sushi rice.
- Tempura Crunch: Toss on a few bits of tempura flakes for that satisfying crispy texture.
Storage & Meal Prep
Sushi bowls are surprisingly meal-prep friendly—if you know how to store them right:
Storage:
- Rice: Store plain rice in an airtight container for up to 4 days. Reheat gently with a splash of water.
- Proteins: Keep raw fish tightly sealed in the fridge and consume within 24 hours. Cooked proteins last up to 3 days.
- Veggies & Sauces: Store sliced veggies in containers lined with paper towels. Sauces can last a week refrigerated.
Meal Prep Tip:
Prep each component ahead and store separately. Assemble just before eating to keep everything fresh and vibrant.
Special Equipment
You don’t need much to make an amazing sushi bowl, but a few tools can really elevate the process:
- Rice Cooker – For perfect, fluffy sushi rice every time without babysitting the stove.
- Sharp Chef’s Knife – Essential for slicing fish and vegetables cleanly.
- Mandoline – Great for consistent, thin veggie slices (radish, cucumber).
- Mixing Bowls – Helpful for prepping multiple components at once.
- Sushi Mat (optional) – If you want to try a rolled version later, it’s a nice add-on.
Frequently Asked Questions
Can I use regular white rice instead of sushi rice?
You can, but it won’t have the same sticky texture or flavor. Short-grain or sushi rice works best for that classic base.
Is raw fish safe to eat at home?
If you use sashimi-grade fish from a trusted source, yes. Keep it refrigerated and eat it the same day.
What can I use instead of raw fish?
Tofu, cooked shrimp, teriyaki chicken, crab, and even roasted chickpeas are excellent substitutes.
Can I make sushi bowls ahead of time?
Yes—store the components separately and assemble just before eating. Avoid assembling with raw fish more than an hour in advance.
Is this recipe gluten-free?
It can be! Use gluten-free soy sauce (like tamari), and check labels on sauces and crab for added gluten.
Nutrition Facts (Per Serving – Approximate)
- Serving Size: 1 bowl
- Calories: 480
- Protein: 28g
- Carbohydrates: 45g
- Fat: 20g
- Saturated Fat: 3g
- Fiber: 6g
- Sugar: 6g
- Sodium: 800mg
- Cholesterol: 40mg
Note: Exact values will vary based on your choice of proteins, toppings, and sauces.
Conclusion
Sushi bowls are more than just a trendy meal—they’re a celebration of color, freshness, and flavor that anyone can make. Whether you’re a sushi lover who wants to skip the takeout, or just looking for a nourishing and fun way to eat more whole foods, these bowls deliver every time.
With endless ways to customize, make-ahead ease, and restaurant-quality flavor, sushi bowls truly live up to the hype. So next time you’re craving sushi, grab a bowl and build your own masterpiece. Trust me—once you start, you’ll never look at sushi the same way again.
PrintThe Growing Popularity of Sushi Bowls: A Fresh Take on a Classic Favorite
- Prep Time: 20
- Cook Time: 25
- Total Time: 45 minutes
- Yield: 4 bowls 1x
Ingredients
For the Sushi Rice:
-
2 cups sushi rice
-
2½ cups water
-
3 tbsp rice vinegar
-
1 tbsp sugar
-
1 tsp salt
Proteins (choose any):
-
4 oz tuna (sashimi-grade), diced
-
4 oz salmon (sashimi-grade), diced
-
4 oz yellowtail, thinly sliced
-
½ cup shrimp, cooked
-
½ cup imitation or real crab
-
½ block tofu, pan-fried
Veggies & Toppings:
-
1 avocado, sliced
-
1 cucumber, sliced
-
1 carrot, julienned
-
¼ cup radishes, thinly sliced
-
½ cup edamame
-
2 tbsp green onions
-
1 sheet nori, cut into strips
-
1 tbsp sesame seeds
Sauces & Condiments:
-
Soy sauce
-
Spicy mayo (mayo + sriracha)
-
Ponzu sauce
-
Pickled ginger
-
Wasabi (optional)
Instructions
-
Cook the rice: Rinse and cook rice. Mix vinegar, sugar, and salt. Fold into cooked rice and let cool slightly.
-
Prep proteins: Dice raw fish (if using sashimi-grade), cook shrimp or tofu, and keep everything chilled.
-
Slice veggies: Thinly cut avocado, cucumber, radish, carrot; boil edamame if frozen.
-
Mix sauces: Combine mayo and sriracha for spicy mayo. Use store-bought or homemade ponzu.
-
Assemble: Start with rice, layer proteins, veggies, garnishes, and drizzle with sauces.
Notes
-
Low-Carb Option: Substitute sushi rice with cauliflower rice or shredded cabbage for a lighter base.
-
Kid-Friendly Version: Skip the raw fish and spicy mayo. Use cooked shrimp, avocado, and soy sauce for a milder, fun build-your-own bowl.